

Oil analysis(OA) is the lab test of the lube oil properties, suspended contaminants, and wear debris. OA is performed during routine maintenance to provide meaningful and accurate information on lubricant and machine condition. By tracking the oil analysis sample results over the life of a particular machine, trends can be established which can eliminate costly repairs.
The lube oil must be sent ashore every 3 months for special laboratory tests such as Spectro-analysis.
Taking Sample for Tests
The onboard L.O. tests are carried out by taking samples from the sampling point, which should be located after the system, with the system in running condition. Before taking the sample, oil must be drained so that stagnant oil in the sampling point is removed. The sample must be kept within control room for cooling it down to normal atmospheric temperature. While doing this, the lid on the sample bottle must be half open else vapour condensing during cooling process will get back into the sample.
ONBOARD LUBE OIL TESTS
- Water Content test
- pH Test
- Viscosity Test
- Spot test
- Flash point test
- Water Crackle test
ANALYSIS REPORT
- ALERT: IMMEDIATE ACTION NECESSARY
- Change oil
- Partly change
- CAUTION: DIAGNOSIS REQUIRED
- Conditions are present where oil may further degrade so action to be taken.
- NORMAL: AS PER SATISFACTORY
- Oil contamination and Equipment are in normal condition.
PARTICLE ANALYSIS-ELEMENTAL ANALYSIS-SPECTROGRAPHY
- Fe- Iron
- Pb- Lead
- Cu- Copper
- Cr- Chromium
- Si- Silicon
- Na- Sodium
- Al- Aluminium
- Sn- Tin
OTHER DETAILS OF ANALYSIS
- Flash point : not below 180 C
- Viscosity- FTIR Fourier transform infra red spectroscopy -5 to +10%
- Oxidation
- TBN : %-10% reserve
- Water content : 0.2% if more than 0.5% replace
- TAN– 0.5 mg Of KOH/ gms of Oil
VISCOSITY
Decreases on contaminations with DO, water
Increases on contaminations with FO
Oxidation and degradation of LO decreases its viscosity
Bacterial growth increases its viscosity.
Water content
- Bacterial growth
- Corrosion
- Loss of lubricity
- Condensation in storage tanks, sumps and holes in tank top.
ADDITIVES
| Desired properties | Additives |
| Foam depressants | Silicates |
| Viscosity index improvers | Polymerized olefins |
| Pour point | Phenols condensed with chlorinated wax |
| Extreme pressure | Lead soaps like lead naptheate, sulphides, chlorides, |
| Oxidation inhibitors | Phenols, metals like tin, and barium |
| Detergency & dispersant | Metallic (tin & barium) based sulphates and phenates. |
| TBN improvers | CaCo3 is main ingredient |
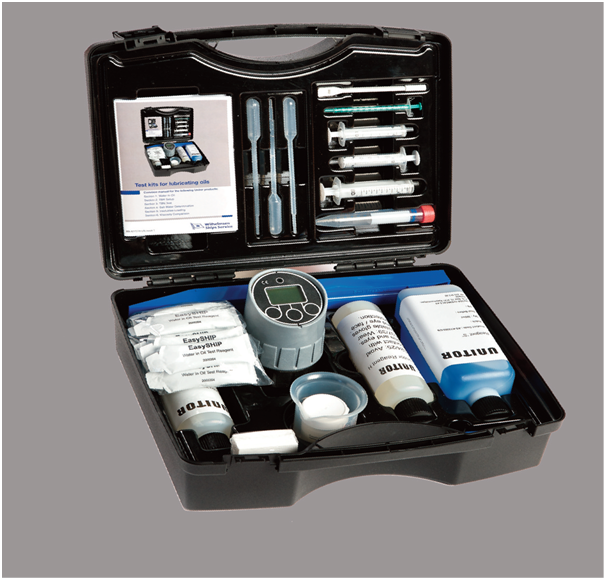
Test kits for lubricating oils
Water in Oil Test
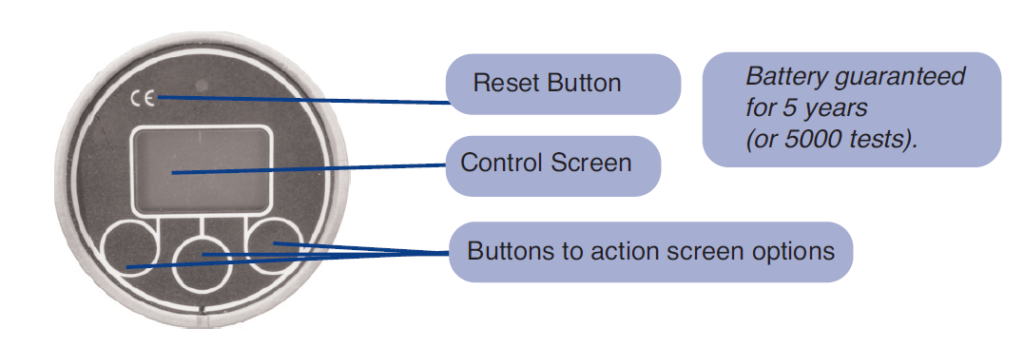
- Press Right hand button to switch the cell on.
- Cell will auto power off after 6 minutes of inactivity.
- Press WATER to select between WATER/TBN mode.
- Press RANGE to select the required range of the test.
Four test ranges are available:
- Range 0 – 10%
- Range 0.02 – 1.0%
- Range 200 – 10,000ppm
- Range 0 – 20%
When using EasySHIP Paste
- Before starting the test: make sure that the inside of the cell is clean and dry (pay particular attention to the seal).
- Unitor EasySHIP Test Reagent must be above 18°C of temperature.
- Always commence the test with the highest range selected, when in doubt about the approximate amount of water in your test oil.
- Over pressure can occur if an oil sample is tested with a very high water content on the low range 0.02-1% (200-10000ppm).This can cause permanent damage to the pressure sensor.
- Shake the bottle of Unitor Reagent S thoroughly.
- Begin test by following on screen instructions.
- Put all of the EasySHIP Paste into the centre of the cell
- Replace lid and press START to commence the test.
- A graph will be plotted during the test time.
- Your results will be displayed after the graph has been plotted.
TBN Test
- Press Right hand button to switch the cell on.
- Cell will auto power off after 6 minutes of inactivity.
- Press TBN to switch between WATER/TBN mode. Select oil desired for test by pressing OIL
- Press NEXT to continue
- Make sure that the inside of the cell is clean and dry (pay particular attention to the seal).
- Begin test by following on screen instructions.
- Note: Use Unitor Reagent TBN. The amount of oil used changes with that of the new oil TBN range.
- Replace lid and press START to commence the test.
- Please make sure that you use the correct amount of reagent and oil. Failure to do this could cause the cell to become over-pressured and damaged.
- A graph will be plotted during the test time (120 seconds)
- Your results will be displayed after the graph has been plotted.
Salt Water Determination
- Add 2ml of Reagent H to the test tube.
- Shake the oil sample bottle and draw off 5ml using the syringe provided. Add this lube oil to the test tube, replace the cap and shake vigorously.
- Keep the tube upright in hot water and allow to stand for 1 hour until the water settles out of the oil sample.
- Take one test pad from the box and replace the lid. Handle the test pads by the edges to avoid contaminating the surfaces with sweat.
- Puncture an area 10 mm in diameter 10 to 15 times with the pin provided.
- Flush a pipette with Reagent H. Place the tip in the water layer in the test tube.
- Press the bulb gently and draw off a sample of the water into the pipette.
- Remove the pipette and wipe out any oil and return a few drops of water to the test tube.
- Place the next drop of water on the prepared test pad.
- Leave the pad to stand for 5 minutes.
- Examine the pad:
- If there is no yellow colour, or only a very faint yellow patch appears, the contamination is fresh water.
- If a large yellow patch appears, the contamination is salt water.
- A positive result would always be checked by testing another pad.
Insolubles Test
- Shake the oil sample to mix the contents and pour a small volume into the beaker.
- Place a clean filter paper on the level surface. Dip the acetate rod into the lube oil and allow the first drop to return to the beaker. Place the second drop onto the paper and set aside for 24 hours.
- Compare the dried spot with the examples given on the page below.
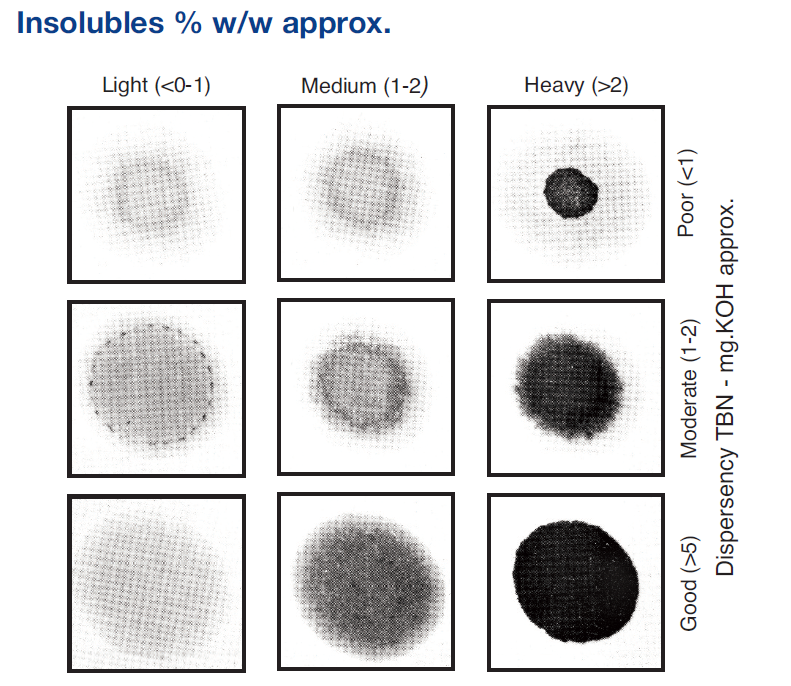
Insolubles
This is indicated by the shade of the spot. A very dark spot indicates a heavy insolubles loading. If the dispersency is poor, only the centre of the spot will be dark.
Dispersency
This is indicated by the colour change from the centre to outside of the spot. A distinct colour change indicates reduced dispersency. (Low TBN is also an indication of reduced dispersency)
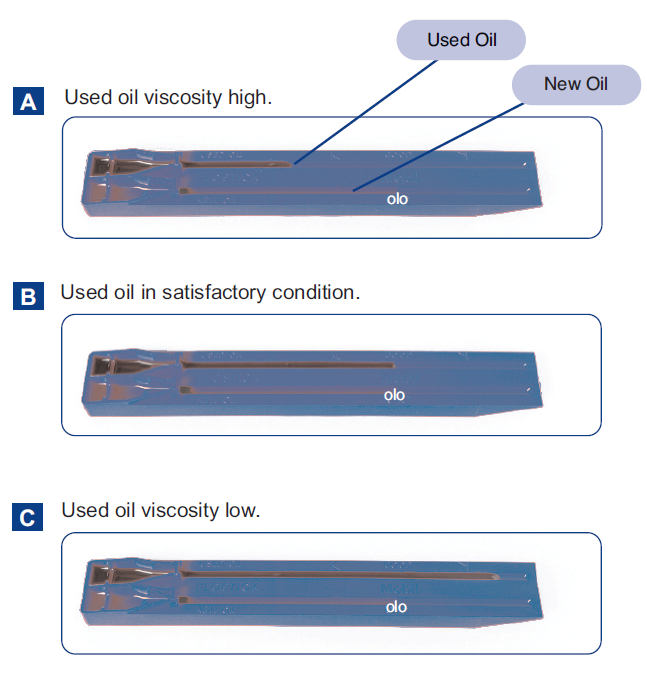
Viscosity Comparison
- Take samples of used and new oil and allow to stand for at least 1 hour.
- It is very important that both samples are at the same temperature.
- Place the Viscosity Stick on aflat, level surface.
- Add 5ml of used oil to one reservoir.
- Add 5ml of new oil to the other reservoir.
- Tilt the Viscosity Stick so that it rests on the angled base and allow the oil to run down the channels. When the new oil reaches the mid point on the scale, return the Viscosity Stick to the horizontal.
- Examine the point reached by the used oil:
- If the used oil has not reached the scale then the viscosity is higher than recommended.
- If the used oil has over run the scale then the viscosity is lower than recommended.


 REQUIREMENTS")